
Photoshop comes with a whole mess of brushes that can be tweaked here and there to create rather nice "real media" effects that look and act like real paint on real paper. We all know this, but somehow making those brushes work is a huge mystery. I have only recently begun to delve into the world of Photoshop brushmaking, after being inspired by JP Balmet's unbelievably realistic PS "oil" paintings. I bothered him to give me some tips, and here's what I've just started to come up with. I know this is a vexing part of PS for many people, so I've decided to do something useful with my blog and post a tutorial! SO! For your consideration:
SMEARY OILY GOODNESS:
Making Great Brushes in PS With Whats Already There!
(This tutorial is written for Adobe Photoshop CS2 for Windows, and uses a Wacom tablet.)
 Step 1 - Open a new file, sized 200 x 200 pixels, 300 dpi. Then simply speckle some dots in a row, neither evenly spaced nor uniform in size. They should look something like this:
To save the brush set, select Edit > Define Brush Preset.
Name the brush (you will be re-saving it later, so name is not all that important)
Your paintbrush tool will now show the large brush in outline, and the new brush preset can be found at the bottom of your brush list.
 Step 2 - In your brush settings (the small icon in the toolbar, next to the tab settings, and the icon with the magnifying glass), highlight "Brush Tip Shape," and spin the rotation tool. The settings are shown in the screenshot at left - you can copy these or spin it yourself. Also, I have the "Spacing" turned all the way down, but you can space the brush as you like.
(At this point, do not be alarmed if your brush does not look like the one shown in the screenshot - it will!)
 Step 3 - Shape Dynamics. With your Wacom, your "Size Jitter" should be set to "Pen Pressure," but select that from the drop down menu if it is not. More importantly, select "Direction" from the "Angle Jitter" menu. This will cause the brush to react like a real flat brush.
 Step 4 - Select the "Texture" menu. You will need to load some new textures into the thumbnail dropdown menu. To do this, click the tiny arrow next to the texture thumbnail, and select the other tiny arrow on the right side of the box. This will drop down another menu to select "Load Patterns." From the load screen, select "Artist Surfaces."
(If your "Patterns" folder does not appear, you can find it here: C:/ > Program Files > Adobe > Adobe Photoshop > Presets > Patterns)

You will now have a nice selection of fabric textures to choose from. Find one to your liking - canvas, linen, denim, etc. Depending on the size of your canvas, you will need to adjust the "Scale" slider to repeat the texture at a size you like.
Under "Mode" select "Darken." You may also like "Hard Mix," but play with the other options to find what you like.
 Step 5 - Select "Dual Brush" from the menu, and find the rough square brush shown (this comes standard with PS). You may use any brush you like to get the desired effects, but this one works pretty well. Play with the diameter if you like, but you want the brush to look natural.
 Step 6 - Select "Other Dynamics." Under "Opacity Jitter" and "Flow Jitter" select "Pen Pressure." This is very important for controlling the pigment of the brush and making it look and act realistically. You can leave one of these settings on "off" depending on your preference.
Save your new brush by clicking the small arrow to the right of "Brushes" tab at the top of your brush settings. Select "New Brush Preset" and name your brush (something good this time!). All your settings will be saved and your new brush will show up at the bottom of the brush menu.
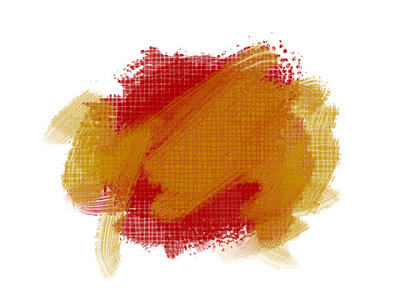
Now play around with your settings until you get something awesome - experimentation is the best way to learn how to make awesome brushes, and develop a brush set all your own!